✔️ Service : ClusterIP 타입
서비스에 의해 할당되는 IP 주소에는 Cluster IP와 External IP가 있다.
Cluster IP는 클러스터 안의 Pod끼리 통신하기 위한 Private IP이며,
External IP는 클러스터 외부에 공개하는 IP 주소이다.
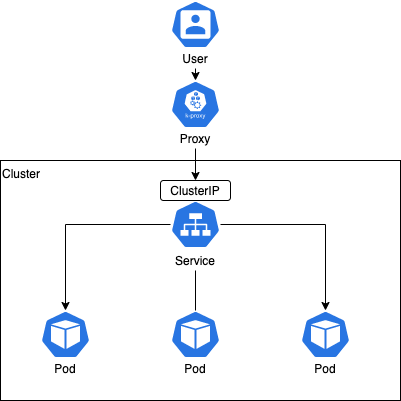
ClusterIP는 클러스터 내부에 새로운 IP를 할당하고 여러 개의 Pod을 바라보는 로드밸런서 기능을 제공한다.
그리고 서비스 이름을 내부 도메인 서버에 등록하여 Pod 간에 서비스 이름으로 통신할 수 있다.
클러스터 내부에서만 접근할 수 있으며, 외부에서 접근이 불가능하므로 Port Forwarding이나 Proxy를 통해 접근해야한다.
서비스 타입을 별도로 지정하지 않으면 ClusterIP가 Default로 설정된다.
✔️ sessionAffinity
svc.spec.sessionAffinity
- 네트워크 세션을 고정시키는 기능
ClientIP와None이 가능하다. default는 세션 고정을 하지 않는None이다.ClientIP: 접속하는 클라이언트의 IP에 따라서 세션을 고정한다.
$ kubectl explain svc.spec.sessionAffinity
KIND:     Service
VERSION:  v1

FIELD:    sessionAffinity <string>

DESCRIPTION:
     Supports "ClientIP" and "None". Used to maintain session affinity. Enable
     client IP based session affinity. Must be ClientIP or None. Defaults to
     None. More info:
     https://kubernetes.io/docs/concepts/services-networking/service/#virtual-ips-and-service-proxies
💻실습 1 : sessionAffinity
myweb-rs-ses.yaml
apiVersion: apps/v1
kind: ReplicaSet
metadata:
  name: myweb-rs
spec:
  replicas: 3
  selector:
    matchLabels:
      app: web
      env: dev
  template:
    metadata:
      labels:
        app: web
        env: dev
    spec:
      containers:
        - name: myweb
          image: ghcr.io/c1t1d0s7/go-myweb
          ports:
            - containerPort: 8080
              protocol: TCP
myweb-svc-ses.yaml
apiVersion: v1
kind: Service
metadata:
  name: myweb-svc-ses
spec:
  type: ClusterIP #클러스터 내부
  sessionAffinity: ClientIP #클라이언트IP를 기준으로해서 밸런싱
  selector:
    app: web
  ports:
    - port: 80
      targetPort: 8080
$ kubectl create -f .엔드포인트가 잘 연결된 것을 확인한다.
$ kubectl get svc,ep,rs,pod
NAME                    TYPE        CLUSTER-IP      EXTERNAL-IP   PORT(S)   AGE
service/kubernetes      ClusterIP   10.233.0.1      <none>        443/TCP   3d10h
service/myweb-svc-ses   ClusterIP   10.233.24.46    <none>        80/TCP    57s

NAME                      ENDPOINTS                                                AGE
endpoints/kubernetes      192.168.100.100:6443                                     3d10h
endpoints/myweb-svc-ses   10.233.90.63:8080,10.233.92.235:8080,10.233.96.74:8080   57s

NAME                       DESIRED   CURRENT   READY   AGE
replicaset.apps/myweb-rs   3         3         3       57s

NAME                 READY   STATUS    RESTARTS      AGE
pod/myweb-rs-4tr64   1/1     Running   0             57s
pod/myweb-rs-9s5pm   1/1     Running   0             57s
pod/myweb-rs-lc8jn   1/1     Running   0             57s
세션이 고정되었기 때문에 항상 동일한 파드로 연결된다.
$ kubectl run nettool -it --image ghcr.io/c1t1d0s7/network-multitool --rm

If you don't see a command prompt, try pressing enter.
/ # curl 10.233.24.46
Hello World!
myweb-rs-9s5pm
/ # curl 10.233.24.46
Hello World!
myweb-rs-9s5pm
/ # curl 10.233.24.46
Hello World!
myweb-rs-9s5pm
/ # curl 10.233.24.46
Hello World!
myweb-rs-9s5pm
/ # curl 10.233.24.46
Hello World!
myweb-rs-9s5pm
--rm 옵션 : 애플리케이션이 종료되면 자동으로 파드를 삭제해준다.
임시로 작업할 때 유용하게 사용할 수 있다
/ # exit
Session ended, resume using 'kubectl attach nettool -c nettool -i -t' command when the pod is running
pod "nettool" deleted
✔️ NamedPort
💻실습 2 : namedPort
myweb-rs-named.yaml
apiVersion: apps/v1
kind: ReplicaSet
metadata:
  name: myweb-rs-named
spec:
  replicas: 3
  selector:
    matchLabels:
      app: web
      env: dev
  template:
    metadata:
      labels:
        app: web
        env: dev
    spec:
      containers:
        - name: myweb
          image: ghcr.io/c1t1d0s7/go-myweb
          ports:
            - containerPort: 8080
              protocol: TCP
              name: web8080 #8080/tcp를 의미
서비스의 targetPort에서 포트의 name을 참조할 수 있다. 이를 NamedPort라고 한다.
myweb-svc-named.yaml
apiVersion: v1
kind: Service
metadata:
  name: myweb-svc
spec:
  selector:
    app: web
  ports:
    - port: 80
      targetPort: web8080 #name 참조
$ kubectl create -f myweb-rs-named.yaml -f myweb-svc-named.yaml
replicaset.apps/myweb-rs-named created
service/myweb-svc created
엔드포인트를 확인했을 때, IP 주소 뒤에 정상적으로 8080이 들어있는 것을 확인할 수 있다.
$ kubectl get ep
NAME         ENDPOINTS                                                AGE
kubernetes   192.168.100.100:6443                                     3d10h
myweb-svc    10.233.90.64:8080,10.233.92.237:8080,10.233.96.75:8080   4s
✔️ MultiPort
컨테이너의 이미지에 따라 포트를 여러 개 사용할 수 있다. 이것을 MultiPort라고 한다.
예를 들어 http와 https를 둘 다 지원하기 위하여 멀티포트를 사용한다.
💻실습 3 : MultiPort
myweb-rs-multi.yaml
apiVersion: apps/v1
kind: ReplicaSet
metadata:
  name: myweb-rs-multi
spec:
  replicas: 3
  selector:
    matchLabels:
      app: web
      env: dev
  template:
    metadata:
      labels:
        app: web
        env: dev
    spec:
      containers:
        - name: myweb
          image: ghcr.io/c1t1d0s7/go-myweb
          ports:
            - containerPort: 8080
              protocol: TCP
              name: http #포트의 이름
            - containerPort: 8443
              protocol: TCP
              name: https
myweb-svc-multi.yaml
apiVersion: v1
kind: Service
metadata:
  name: myweb-svc-multi
spec:
  selector:
    app: web
  ports:
    - port: 80
      targetPort: 8080
      name: http
    - port: 443
      targetPort: 8443
      name: https
$ kubectl create -f myweb-rs-multi.yaml -f myweb-svc-multi.yaml멀티포트(8080,8443)로 연결되어 3*2=6 총 6개의 엔드포인트가 생긴 것을 확인할 수 있다.
$ kubectl get svc,ep
NAME                      TYPE        CLUSTER-IP      EXTERNAL-IP   PORT(S)          AGE
service/kubernetes        ClusterIP   10.233.0.1      <none>        443/TCP          3d10h
service/myweb-svc-multi   ClusterIP   10.233.60.121   <none>        80/TCP,443/TCP   4m15s

NAME                        ENDPOINTS                                                            AGE
endpoints/kubernetes        192.168.100.100:6443                                                 3d10h
endpoints/myweb-svc-multi   10.233.90.65:8443,10.233.92.238:8443,10.233.96.76:8443 + 3 more...   4m15s
$ kubectl describe ep myweb-svc-multi
Name: myweb-svc-multi
Namespace: default
Labels: <none>
Annotations: <none>
Subsets:
Addresses: 10.233.90.65,10.233.92.238,10.233.96.76
NotReadyAddresses: <none>
Ports:
Name Port Protocol
---- ---- --------
https 8443 TCP
http 8080 TCP
Events: <none>