IaC/Ansible
[Ansible] Ad-Hoc으로 WordPress 구성부터 원복까지
nayoungs
2022. 4. 14. 23:02
728x90
📌INDEX
✔️ Ad-Hoc으로 WordPress 구성하기
🐾 들어가기에 앞서....
- ansible 모듈을 사용할 때는 요구사항(requirement)를 잘 확인하자
- required 파라미터를 잘 확인하자 : 꼭 포함시켜야하는 파라미터
- 상태(state)는 항상 표시해주는 것이 좋음
1. Inventory 파일 수정하기
- (편의를 위해) wp (wordpress) 그룹 생성
[vagrant@controller ~]$ vi inventory.ini
[vagrant@controller ~]$ cat inventory.ini
192.168.100.11
192.168.100.12

[wp]
192.168.100.11
2. ~/.ansible.cfg 에 inventory 지정 및 설정
[vagrant@controller ~]$ cat ~/.ansible.cfg
[default]
inventory=./inventory.ini
remote_user=vagrant
host_key_checking=False
ask_pass=False

[privilige_escalation]
become=False
become_method=sudo
become_user=root
become_ask_pass=Falsets
3. yum 모듈을 사용하여 php74 설치를 위한 rpm repository 설치 및 준비
- remirepo
- (편의를 위해) 인증서 확인을 하지 않음 -> validate_cert : no
[vagrant@controller ~]$ ansible wp -m yum -a "name=https://rpms.remirepo.net/enterprise/remi-release-7.rpm state=present validate_certs=no" -b- remi-safe 비활성
[vagrant@controller ~]$ ansible wp -m yum_repository -a 'name=remi-safe file=remi-safe mirrorlist=http://cdn.remirepo.net/enterprise/7/safe/mirror description=remi-safe enabled=no' -b[vagrant@controller ~]$ ansible wp -m yum_repository -a 'name=remi-php74 file=remi-php74 mirrorlist=http://cdn.remirepo.net/enterprise/7/php74/mirror description=remi-php74 enabled=yes' -b
4. rpm_key 모듈로 gpg key 가져오기 및 import
[vagrant@controller ~]$ ansible wp -m rpm_key -a "key=/etc/pki/rpm-gpg/RPM-GPG-KEY-remi state=present" -b
[vagrant@controller ~]$ sudo rpm --import /etc/pki/rpm-gpg/RPM*
5. 필요한 패키지 설치
[vagrant@controller ~]$ nsible wp -m yum -a 'name=httpd,php,php-mysql,mariadb,mariadb-server,python2-PyMySQL state=installed' -b
6. httpd(apache) 시작 및 활성화
[vagrant@controller ~]$ ansible wp -m service -a 'name=httpd state=started enabled=yes' -b
7. mariadb 시작 및 활성화
[vagrant@controller ~]$ ansible wp -m service -a 'name=mariadb state=started enabled=yes' -b
8. wordpress 설치
- get_url
- get_url 모듈을 사용하여 url로 wordpress 설치
[vagrant@controller ~]$ ansible wp -m get_url -a 'url=https://wordpress.org/wordpress-5.9.3.tar.gz dest=/home/vagrant'
9. wordpress 아카이브 해제
- unarchive
- unarchive 모듈을 사용하여 아카이브 해제
- remote_src 파라미터 : 아카이브 해제 디렉토리 지정
- owner, group 파라미터 : wordpress 소유자, 그룹 소유자 변경
[vagrant@controller ~]$ ansible wp -m unarchive -a 'src=/home/vagrant/wordpress-5.9.3.tar.gz remote_src=yes dest=/var/www/html owner=apache group=apache' -b- node1(192.168.100.11)에서 wordpress 확인
[vagrant@node1 ~]$ ls /var/www/html
wordpress
10. http://ip/wordpress로 wordpress 접속해보기
- 만약 이미지가 깨져보이거나(인터페이스가 이상) 보안상 Testing Page(defualt Page)가 보이지 않게 하고 싶다면?
- replace 모듈을 사용하여 index.html -> index.php로 변경해보자
- replace
[vagrant@controller ~]$ ansible wp -m replace -a 'path=/etc/httpd/conf/httpd.conf regexp=index.html replace=index.php' -b
[vagrant@controller ~]$ ansible wp -m service -a 'name=httpd state=restarted' -b
11. wordpress database 생성
[vagrant@controller ~]$ ansible wp -m mysql_db -a 'name=wordpress state=present login_user=root'
12. wordpress database 사용자 생성
[vagrant@controller ~]$ ansible wp -m mysql_user -a 'name=wpadm password=P@ssw0rd state=present login_user=root priv="wordpress.*:ALL"'
13. node1(wp)에 생성한 사용자로 접속해서 wordpress database 확인해보기
[vagrant@node1 ~]$ mysql -u wpadm -p
Enter password:
Welcome to the MariaDB monitor.  Commands end with ; or \g.
Your MariaDB connection id is 4
Server version: 5.5.68-MariaDB MariaDB Server

Copyright (c) 2000, 2018, Oracle, MariaDB Corporation Ab and others.

Type 'help;' or '\h' for help. Type '\c' to clear the current input statement.

MariaDB [(none)]> show databases;
+--------------------+
| Database           |
+--------------------+
| information_schema |
| test               |
| wordpress          |
+--------------------+
3 rows in set (0.00 sec)
14. wp-config.php 파일 생성
- copy
- copy 모듈을 사용하여 wp-config-sample.php 파일을 wp-config.php로 복사
- owner와 group을 apache로 지정해주지 않는다면, -b옵션으로 진행하기 때문에 파일 소유자가 root:root 가 됨
[vagrant@controller ~]$ ansible wp -m copy -a 'src=/var/www/html/wordpress/wp-config-sample.php remote_src=yes dest=/var/www/html/wordpress/wp-config.php owner=apache group=apache' -b
15. wp-config.php 파일 내용 수정
- 데이터베이스 이름과, 사용자, 암호를 변경해줌
[vagrant@controller ~]$ ansible wp -m replace -a 'path=/var/www/html/wordpress/wp-config.php regexp=database_name_here replace=wordpress' -b[vagrant@controller ~]$ ansible wp -m replace -a 'path=/var/www/html/wordpress/wp-config.php regexp=username_here replace=wpadm' -b[vagrant@controller ~]$ ansible wp -m replace -a 'path=/var/www/html/wordpress/wp-config.php regexp=password_here replace=P@ssw0rd' -b
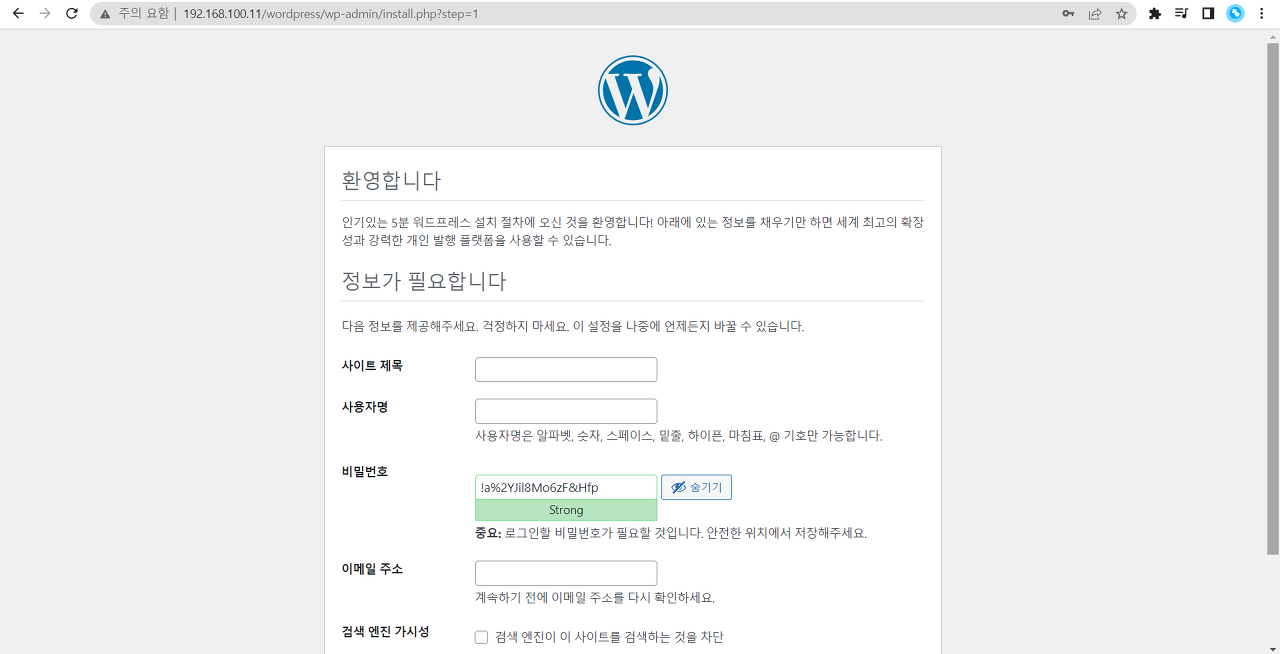
16. wordpress 접속!
- 정보입력 후 [워드프레스 설치] 버튼을 눌렀을 때 데이터베이스 스키마(schema)가 생성됨
- 스키마 생성확인
MariaDB [wordpress]> show tables;
+-----------------------+
| Tables_in_wordpress   |
+-----------------------+
| wp_commentmeta        |
| wp_comments           |
| wp_links              |
| wp_options            |
| wp_postmeta           |
| wp_posts              |
| wp_term_relationships |
| wp_term_taxonomy      |
| wp_termmeta           |
| wp_terms              |
| wp_usermeta           |
| wp_users              |
+-----------------------+
12 rows in set (0.00 sec)
✔️ 원복하기
지금까지 Ad-Hoc 명령을 통해 설치하고 구성한 wordpress 환경을 원복(원상복귀)해보자.
1. 서비스 중단시키기
- 가장 먼저 서비스를 중단시킨다.
- 서비스를 중단시켜야 프로세스가 종료되고, 필요한 것들을 삭제할 수 있음
- httpd(apache)와 mariadb 정지
[vagrant@controller ~]$ ansible wp -m service -a 'name=httpd state=stopped' -b
[vagrant@controller ~]$ ansible wp -m service -a 'name=mariadb state=stopped' -b
2. wordpress 디렉토리 삭제
- file
- file 모듈을 이용하여 /var/www/html/wordpress 삭제 : state=absent
[vagrant@controller ~]$ ansible wp -m file -a 'path=/var/www/html/wordpress state=absent' -b
3. wordpress 파일 삭제
[vagrant@controller ~]$ ansible wp -m file -a 'path=/home/vagrant/wordpress-5.9.3.tar.gz state=absent' -b
4. 패키지 삭제하기
[vagrant@controller ~]$ ansible wp -m yum -a 'name=httpd,php,php-mysqlnd,mariadb,mariadb-server,python2-PyMySQL autoremove=yes state=absent' -b- autoremove=yes: 의존하는 패키지들까지 모두 삭제
⭐참고)
- yum 을 통해 패키지를 설치하면 해당 패키지만 설치되는 것이 아니라 의존하는 패키지들까지 설치됨
- yum remove와 같이 패키지를 삭제하면 해당 패키지, 그리고 direct로 연결된 패키지만 지워짐
- 패키지가 설치될 때 함께 설치되었던 패키지들이 지워지지 않고 남아있을 수 있음
- yum autoremove [패키지]를 사용하면, [패키지]에 관련된 모든 의존 패키지들을 지워줌
- 뒤에 패키지를 명시하지 않고, yum autoremove만 사용하면 의존성, 관계없는 것들을 알아서 찾아서 모두 지워줌
5. 데이터베이스 data 삭제
[vagrant@controller ~]$ ansible wp -m file -a 'name=/var/lib/mysql state=absent' -b
6. remi-release 패키지 삭제
- 마지막에 지우는 이유는?
- 앞에서 같이 지우지 않는 이유는 함께 지우면 레포지토리 정보가 없기때문에 패키지 의존성 정보가 없어짐
[vagrant@controller ~]$ ansible wp -m yum -a 'name=remi-release autoremove=yes state=absent' -b
원복완료!
지금까지 wordpress 구성부터 원복까지 알아보았다
728x90